Image Editing Tip: You can still use the Magic Wand with lighter-colored images
One of the Photoshop tools I use frequently when promoting my artwork is the magic wand. It’s this tool:
It’s easy to select and delete backgrounds where there’s a clear difference between the background color and the product, but where I tend to run into trouble is with images where there’s a white or light background, and a white or light product design. If you click on this image, you can see that the “marching ants” have selected parts of the hair tie as well as the white background that I wanted to delete on this layer:

I’ve come up with an ingenious solution, and I thought I would share it with you.
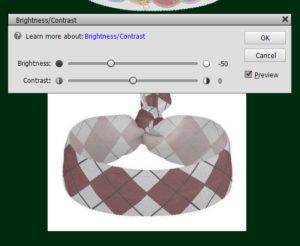
First, I adjust the lighting (under Enhance–I’m usually doing this in Photoshop Elements 13) by using the Brightness/Contrast option:

Setting the brightness to -50 makes the white on the hair tie gray.

Now I can use the magic wand to select just the white background and delete it!

This leaves me with a grayish hair tie. To restore the white, I reopen the Enhance menu, select Lighting, select Brightness/Contrast, and reset Brightness to +50:

Or–if I really want to cheat and do a bunch of products at once, I’ll go https://pinnable.colleenmichele.com/, input the URL of a collection, and select the “transparent background” option. Sometimes this works well–and sometimes it doesn’t work at all. It depends on how the product mockup was constructed. Play around with the options on Colleen’s site and see what you can do with them. In addition to creating image links for pinning on Pinterest, I’ve found that it also makes excellent collection headers for Zazzle too, like the one below.
I hope this magic wand image editing tip was helpful! Do you have any neat editing tricks that you use to make promoting your artwork a little easier? Leave a note in the comments or use the contact options to write me an email.
